Post Installation Steps for Powermanager
The post installation steps of Powermanager are used to configure the following:
- Website
- WSI application
- D3 Visualization application
- Advance Reporting application
Considerations for Post Installation Steps
IIS is configured
Powermanager extension and associated extensions including WSI, Advance Reporting, D3 Visualization are installed.
For working with Modbus devices, Modbus extension is installed.
For working with IEC61850 devices you have installed IEC61850 Power Devices extension.
Post Installation Steps for Powermanager:
- Modify the AutomaticProjectConfiguration.json file located at
…\InstallFiles\Upgrades\EP\EM\SMC\PostInstallation\AutoProjectStartup
to configure Project, Database and Website details or Powermanager.
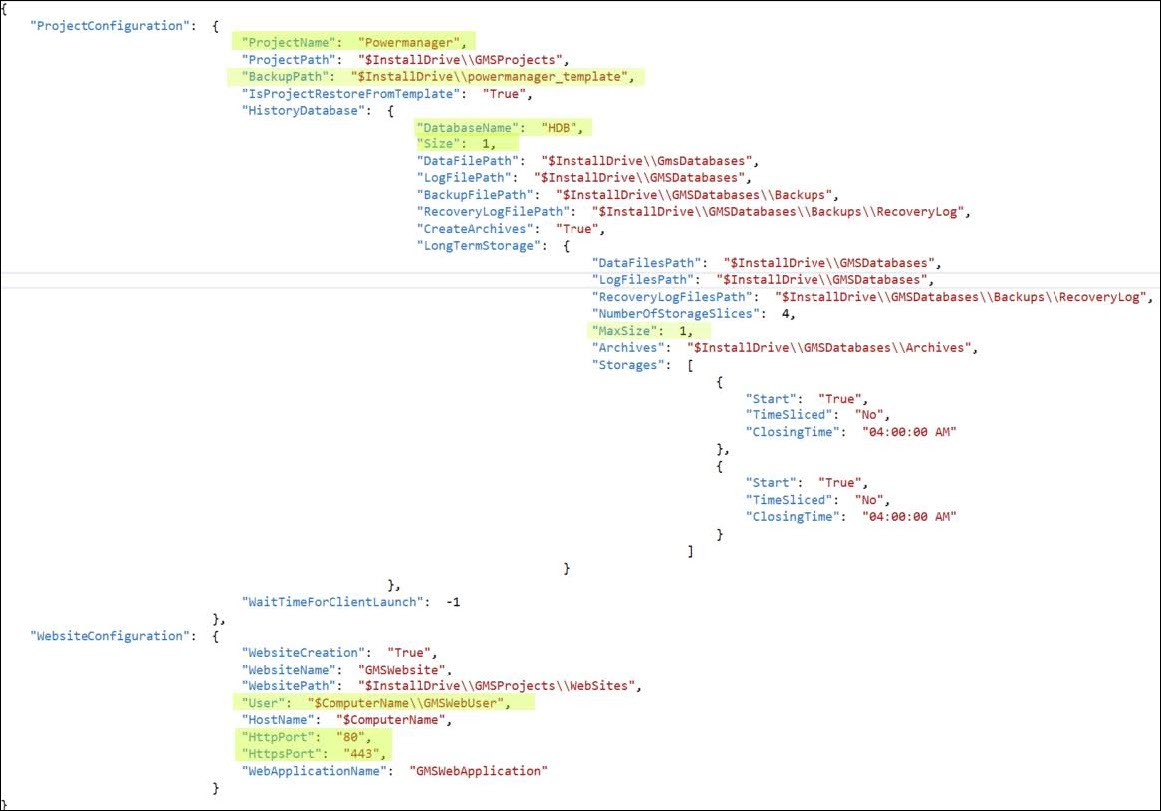
- ProjectName: Add the name for the project for example, Powermanager
- BackupPath: In the folder …\InstallDrive:\ProjTemplates ensure that the powermanager_template is available.
Alternatively, you can keep the project template in any other directory.
In case the directory is changed the backup path in the Json needs to be changed as follows: BackupPath: $InstallDrive\\powermanager_template
- Database Name: Enter the appropriate value for example, HDB1
- Size: Set appropriate database size, default is 1 GB
- MaxSize: Set appropriate size for each storage slice, default is 1 GB
- HTTPPort and HTTPsPort: Configure unique ports. Make sure that the ports 80 and 443 are not in use by any other application using IIS
If the ports are in use assign unique port numbers. If you change the Ports please make sure that they are allowed by Chrome browser, to check this you can browse for unsafe ports by Chrome.
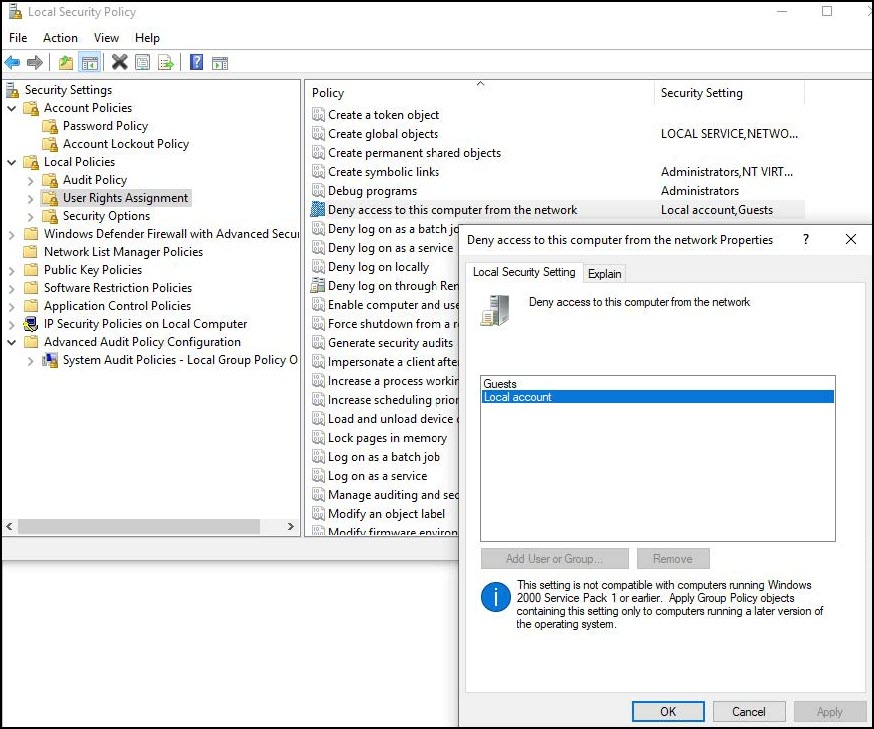
- Make sure that your Local security policy allows local accounts to access network. If the local account is denied access as shown in the image below, specify a user in the json file with proper access rights for website. "User": "YourDomain\\UserName".
- Copy the Post Installation files to the correct location:
- SMCPostInstallationConfig.xml in folder …\InstallFiles\Upgrades\EP\EM\SMC\PostInstallation.
- Advanced_ReportingPostInstallationConfig.xml in folder …\InstallFiles\Upgrades\EP\EM\Advanced_Reporting\PostInstallation.
- D3_VisualizationPostInstallationConfig.xml in folder …\InstallFiles\Upgrades\EP\EM\D3_Visualization\PostInstallation.
You must manually append /#/dashboard to the Dashboard URL.
- Web_Service_InterfacePostInstallationConfig.xml in folder …\InstallFiles\Upgrades\EP\EM\Web_Service_Interface\PostInstallation.
- Proceed with the management station installation along with the post installation steps execution. (see Install the Management Station)
- After the successful installation, Powermanager project is created along with this:
- Web site is created.
- Database is created with 4 LTS.
- WSI, Advanced Reporting, D3 Visualization post installation steps executed.
- Next, the user name for Desigo CC Client is set to defaultadmin and password is 1, reset the password on first logon and launch Desigo CC.
For more information, see Installing and Configuring Powermanager Extension.

Ensure that the Powermanager report templates are synchronized properly. The templates can be found in the below location:
…\Powermanager\libraries\Global_powermanager_HQ_1\AdvancedReports
Template synchronization, mapping of network, and assigning application rights is not required if the project is restored.