Message Editor Tab
In the System Browser, when you select Applications > Notification > Notification Templates, the Message Editor tab displays allowing you to configure messages using the following expanders along with the toolbar controls listed below:
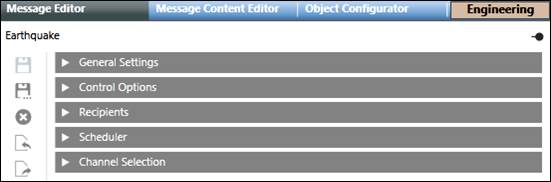
- General Settings: Configure the message description along with the message type and revision number.
- Control Options: Configure the message priority, priority tolerance, escalation with other details like delivery mode and expiration time.
- Recipients: Add or remove recipients for the message template.
- Scheduler: (Available only for Reno Plus and MNS license users) Configure the message scheduling pattern.
- Channel Selection: (Available only for Reno Plus and MNS license users) Allows selection of a subset of delivery methods and device types for sending a message.
General Settings
The General Settings expander in Message Editor tab is as shown in the following image:
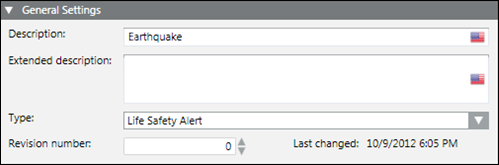
- Description: Enter the description for the message template.
- Extended description: Enter an extended description for the message template.
- Type: Select the message type.
- Revision number: Select the revision number for the message template.
- Last changed: Displays the date and time of the last changes made to the message template.
Control Options
The Control Options expander in the Message Editor tab is as shown in the following image:
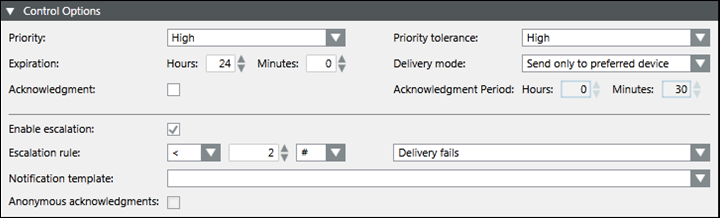
- Priority: Select the priority of the message. The drop-down list contains the following priorities:
- Low
- BelowNormal
- Normal
- AboveNormal
- High
- Expiration: Select the expiration time for the message. The minimum expiration time is 1 minute and the maximum expiration time is 999 hours and 59 minutes.
NOTE: The message is removed from the recipient devices and response collection stops after the expiration time. - Acknowledgment: When a message template has the Acknowledgment check box selected, recipient users can provide read acknowledgments by manually replying to the messages received on recipient user devices.
- Enable escalation: Select the check box to enable escalation configuration.
- Escalation rule: Enabled only if the Enable escalation check box is selected. It allows you to:
- Select the operator like less than <, greater than >, and so on from the drop-down list.
- Enter the value.
- Select the percentage % or exact value indicator # from the drop-down list.
- Select the condition for escalation from the drop-down list.
For example, select Delivery fails, if you want to escalate a message if the message delivery fails for more than five Recipient Users: - The operator to be selected for the above case must be greater than >.
- The value to be selected must be 5.
- The exact value indicator # must be selected from the drop-down list.
- The condition to be selected must be Delivery fails.
The Acknowledged recipients escalation rule option requires that the Acknowledgment option is enabled.
- Notification Template: Enabled only if the Enable escalation check box is selected. Notification templates that must be launched when the escalation rule is met. For message templates that are part of an incident template, allows you to select a targeted notification template from the drop-down list. Alternatively, you may drag and drop a stand-alone notification template from the System Browser hierarchy to configure the targeted notification template.
NOTE: Notification templates cannot be dragged and dropped for escalation in Web and Windows App clients. For Web and Windows App clients, you need to select a targeted notification template from the drop-down list. - Anonymous acknowledgments: Select this box to include the acknowledgments that are not mapped to any recipient user as valid acknowledgments to be considered for the escalation rule.
- Priority Tolerance(Available only for MNS license users): Select the priority tolerance of the message.
- Delivery mode: Select the mode of delivery of the message to the Recipient user. The available options are:
- Send to first device: Message is sent to the device first configured in the recipient user devices list. The message is not sent to other device irrespective of delivery failure/non-acknowledgment.
- Send to devices in sequence upon failure: The message is sent to the recipient user devices in sequence. In case of delivery failure for this device, the message is sent to the next device in sequence.
- (Available only for Reno Plus and MNS license users)Send to all devices at once: The message is sent to all devices in the recipient user devices list at a time.
- (Available only for Reno Plus and MNS license users)Send to device in sequence on non-acknowledgment: The message is sent to device in sequence of the recipient user devices list. If the message is not acknowledged within the acknowledgment period then, the message is sent to the next device in the sequence.
- Acknowledgment Period: Define the time period starting from the start of delivery of a message during which the system will collect and evaluate the acknowledgments. For unscheduled messages, start of delivery is the same as launch time. For scheduled messages, start of delivery is the time when the message is switched to Active state.
Recipients
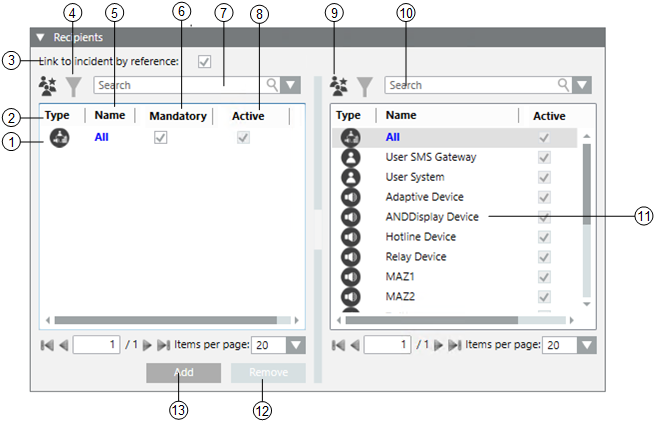
The Recipients expander in the Message Editor or Live Announcement Editor tab is as shown in the following image:
| Name | Description |
1 | NA | Displays the list of the recipients added to the message template or live announcement template. |
2 | Type | Displays the icons of the Recipient Type for the available recipients. |
3 | Link to incident by reference(Available only for MNS license users) |
|
4 | Filter recipients | Filters the recipients as per their categories (for example, Users, Devices, Locations, and Groups) |
5 | Name | Indicates the name of the recipient. |
6 | Mandatory | Select this check box to make the recipient a mandatory recipient of the message or live announcement that cannot be unselected during a message or live announcement launch. |
7 | Search | Search for a particular recipient from the list of added recipients for the message or live announcement. |
8 | Active(Available only for Reno Plus and MNS license users) | If this checkbox is checked then only recipient will be active and will receive message. |
9 | Contact List | Toggle between the contact list and configured recipients. |
10 | Search | Search for a particular recipient from the list of available recipients. |
11 | NA | Displays the list of the available recipients. |
12 | Remove | Removes a recipient from the message template or live announcement template. |
13 | Add | Adds a recipient to the message template or live announcement template. |
Scheduler
The Scheduler expander is available only for Reno Plus and MNS license users.
This expander in the Message Editor tab is as shown in the following image:
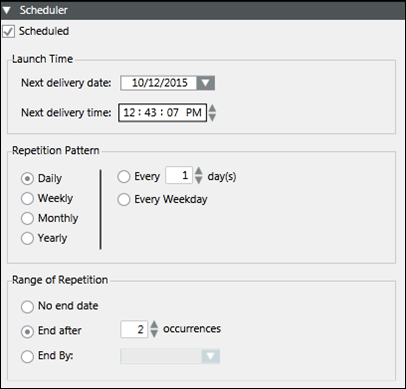
- Scheduled: Select this check box to enable the different scheduling options.
- Launch Time: Enter the date and time when the message shall be launched for the first time.
- Repetition Pattern: Select the required repetition pattern and select or enter the corresponding value.
- Range of Repetition: Select the range of repetition for the message and enter the corresponding value.
Channel Selection
The Channel Selection expander is available only for Reno Plus and MNS license users.
This expander allows you to select a subset of delivery methods and device types for sending a message.

| Name | Description |
1 | NA | Allows you to select/clear all Device Types. |
2 | Device Type | Displays the configured device types. |
3 | NA | Allows you to select/clear all the Text Device Types. |
4 | Text | Displays whether the corresponding device supports text as a Delivery Method. A check box is displayed if the device is capable of processing text. |
5 | NA | Allows you to select/clear all the Audio Device Types. |
6 | Audio | Displays whether the corresponding device supports audio as a Delivery Method. A check box is displayed if the device is capable of processing audio. |
7 | NA | Allows you to select/clear all the Multimedia Device Types. |
8 | Multimedia | Displays whether the corresponding device supports multimedia as a Delivery Method. A check box is displayed if the device is capable of processing multimedia. |
The Message Content Editor tab allows to add and configure the message content in the form of text, audio or multimedia.
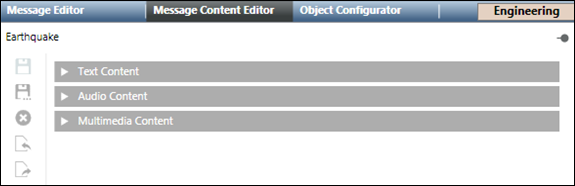
- Text Content: Configure the message content details like title, short and long text, short and long signatures, and variables.
- Audio Content: Add an audio file to the message template.
- Multimedia Content: Add a multimedia file to the message template.

NOTE:
The Save As  and Delete
  functions are disabled for Web and Windows App clients.
Text Content
The Text Content expander in the Message Content Editor tab is shown in the following image:
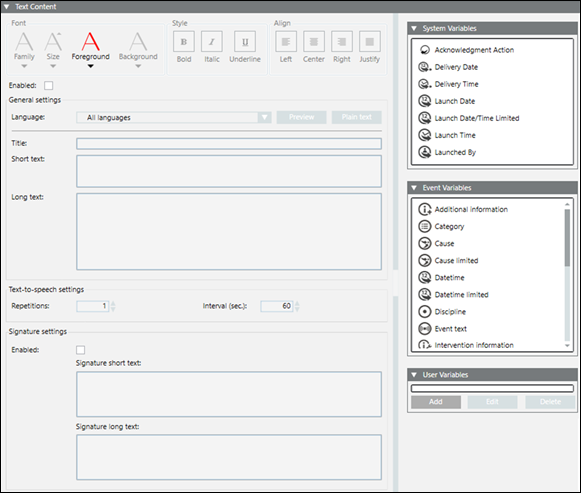
- Align: Select the suitable alignment for the message text.
- Style: Select a suitable style for the message text.
- Font: Select a suitable font for the message text.
- Enabled: Enable the text content in the message template.
- Language: Allows you to change the language in which the text content is displayed. It is mandatory to provide text content in the default All Languages language. Optionally, text content can be localized for each language individually. If no localized content is provided in a specific language, then the All Languages content is sent to language-specific devices.
- Title: Enter the title of the message.
- Short Text: Enter the short text for the message. The short text is used as a content for messages that are sent through SMS and pager. New line is supported in short text. The short version of the message is sent to devices with limited display capacity.
- Long Text: Enter the long text for the message. New line is supported in long text. The long version of the message is displayed on audio-enabled devices. The long text is used for text that is included as a body of an email, and so on.
- Repetitions: (Available only for MNS license users) Enter the number of repetitions the message is played on the audio device.
- Enabled: (Available only for Reno Plus and MNS license users) Enable the Signature field.
- Signature Short Text: (Available only for Reno Plus and MNS license users) Enter the short text of the signature for the message.
- Signature Long Text: (Available only for Reno Plus and MNS license users) Enter the long text of the signature for the message.
- Interval (sec): (Available only for MNS license users) Enter the interval in seconds between two consecutive repetitions.
- Preview: Preview the signature in the Short and Long Text fields.
- Plain Text: Convert the formatted text to plain text.
- Add: Add a new user variable.
- Edit: Edit the selected user variable.
- Delete: Delete the selected user variable.
- User Variables: Displays the list of user variables. These variables can be dragged and dropped to title, short text, and long text.
The check box next to the variable displays whether the variable is global or template-specific. If checked, the variable is global. The variable is template-specific if the check box is clear. - Event Variables: Displays the list of event variables. These variables can be dragged and dropped to title, short text, and long text. Please refer to the Event Variables table below for more information on the different variable icons and their description.
- System Variables: Displays the list of system variables. Except acknowledgement action variable, the system variables can be dragged and dropped to title, short text, and long text.
Please refer to the System Variables table below for more information on the different variable icons and their description.
While sending a message to Adaptive and ESPA 4.4.4 device, language-specific special characters (see below table) added in short text are by default replaced with corresponding replacement character.
While sending a message to all devices, language-specific special characters added in short text can be replaced with replacement character. For this, please contact system administrator.
Below table for language-specific special characters can be extended for other characters. For this, please contact system administrator.
Language | Special character | Replacement character |
Czech | ě, ř, ů | e, r, u |
Danish | æ, ø, å, Å | a, o, a, A |
Dutch | ij | I |
Finish | ä, ö | ae, oe |
French | è, é, à, á, â, ô, œ, ç | e, e, a, a, a, o, o, c |
German | ä, ö, ü, ß | ae, oe, ue, ss |
Hungarian | ő, ű | o, u |
Italian | à, è, ì, ù | a, e, i, u |
Norwegian | æ, ø, å, Å | a, o, a, A |
Polish | ń, ź, ż, ł, ó, ś, ć, ą, ę | n, z, z, t, o, s, c, a, e |
Portugese | ã, õ, ç | a, o, c |
Romanian | ţ, ă | t, a |
Spanish | ñ, á, é, í, ó, ú | n, a, e, i, o, u |
Slovakian | ĺ, ä, ô, l´ | I, ae, o, I |
Swedish | ä ö å | ae, oe, a |
Turkish | ı, İ, ğ | i,I,g |
System Variables | ||
| Name | Description |
| Acknowledgment Action | Placeholder to customize the action that recipient users need to take to acknowledge messages. NOTE: Messages are customized for each device type and in the respective recipient user languages. For example, recipient users can reply to SMS by sending back manually entered text but click tional)links in emails. |
| Delivery Date | Placeholder for the date on which message is delivered to a device. |
| Delivery Time | Placeholder for the time on which message is delivered to a device. |
| Launch Date | Placeholder for the date on which the incident was launched. |
| Launch Date/Time Limited | Placeholder for the date and time in short format on which the incident was launched. |
| Launch Time | Placeholder for the time on which the incident was launched. |
| Launched By | Placeholder for the name of the system operator initiating the incident. |


Event Variables | ||
| Name | Description |
| Additional Information | Placeholder for the additional information attribute of the triggering event. |
| Category | Placeholder for the event category like Alarm, Fault, Life Safety etc. |
| Cause | Placeholder for the cause of the event. |
| Cause limited | Placeholder for the cause of the event in short format. |
| Datetime | Placeholder for the date and time of the event creation. |
| Datetime limited | Placeholder for the date and time of the event creation in short format. |
| Discipline | Placeholder for the discipline where the event has occurred like Building Automation, Building Infrastructure etc. |
| Event text | Placeholder for the event text of the event. |
| Intervention Information | For messages that are part of an incident triggered by an event, this variable is a placeholder for the intervention information for the event. |
| Location | Placeholder for the location or the hierarchy path in the system where the event has occurred. |
| Location limited | Placeholder for the location or the hierarchy path in the system where the event has occurred in short format. |
| Message text | Placeholder for the message text of the event. |
| Source | Placeholder for the source of the event. |
| Source alias | Placeholder for the source alias of the event. |
| Source limited | Placeholder for the source of the event in short format |
| Source status | Placeholder for the source status of the event. |
| Status change | Placeholder for the status changes of the event. |
| Subdiscipline | Placeholder for the sub discipline of the event. |
| Subtype | Placeholder for the subtype of the event. |
| Type | Placeholder for the type of the event. |


User Variables - Data Types
Data Types | |
Item | Description |
Integer | Prompts the user to enter an integer value as the input. Enter a numeric value as the default value. |
Floating Point | Prompts the user to enter a floating point value as the input. Enter a numeric value as the default value specifying the number of decimals allowed. |
Date | Prompts the user to enter a date as the input. Select a date as the default value specifying the display format (short, long, month-day, year-month). |
Time | Prompts the user to enter a time as the input. Select a time as the default value specifying the display format (short, long). |
DateTime | Prompts the user to enter a date and time as the input. Select a date and time as the default value specifying the display format (short, long, month-day, year-month). |
Text | Prompts the user to enter a text as the input. Enter a text as the default value specifying the maximum length. |
Select | Prompts the user to select one value from the available choices list as the input. Enter multiple choices for the user to choose a value from. |
Multiselect | Prompts the user to select one or multiple values from the available choices list as the input. Enter multiple choices for the user to choose values from. |
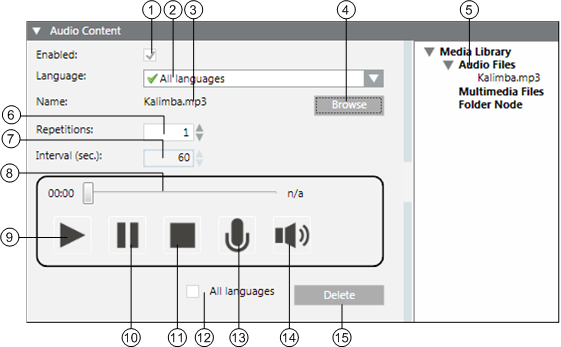
Audio Content
The Audio Content expander in the Message Content Editor tab is as shown in the following image:
| Name | Description |
1 | Enabled | Enable audio content in the message template. |
2 | Language | Allows you to change the language in which the audio content is displayed. It is mandatory to provide audio content in the default All Languages language. Optionally, audio content can be localized for each language individually. If no localized content is provided in a specific language, then the All Languages content is sent to the language-specific devices. |
3 | Name | Enter the name of the associated audio file. |
4 | Browse | Allows you to browse the local file system and upload a file as audio content. You can upload MP3 and WAV files. |
5 | Media Library Nodes(Available only for MNS license users) | View the list of media files from where the required audio file can be dragged and dropped to the message under Name. |
6 | Repetitions(Available only for MNS license users) | Enter the number of repetitions the message is played on the audio device. |
7 | Interval (sec.)(Available only for MNS license users) | Enter the interval in seconds between two consecutive repetitions. |
8 | Progress bar | Progress bar for playing audio. |
9 | Play | Play the uploaded audio file or the recorded audio content. |
10 | Pause | Allows you to pause playing the uploaded audio file or the recorded audio content. |
11 | Stop | Allows you to stop playing the uploaded audio file or the recorded audio content. |
12 | All languages | Delete the audio files of all languages. |
13 | Record | Allows you to start recording of an audio message. |
14 | Volume | Allows you to roll over to adjust the volume. |
15 | Delete | Delete the uploaded audio file or the recorded audio content. |
Multimedia Content
The Multimedia Content expander in the Message Content Editor tab is as shown in the following image:
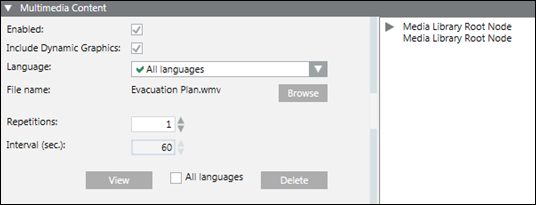
- Enabled: Enable multimedia content in the message template.
- Include Dynamic Graphics: Select to include the available dynamic graphics effective in case of incident triggering workflow.
- Language: Allows you to change the language in which the text content is displayed. It is mandatory to provide multimedia content in the default All Languages. Optionally, multimedia content can be localized for each language individually. If no localized content is provided in a specific language, then the All Languages content is sent to language-specific devices.
- Browse: Browse the local file system and upload a file as multimedia content.
- Media Library Nodes: (Available only for MNS license users) View the list of media files from where the required multimedia file can be dragged-and-dropped to the message under Name
- Repetitions: (Available only for MNS license users) Enter the number of repetitions the multimedia file is played.
NOTE: The repetition count is not used by any of the currently supported device types. - Interval (sec.): (Available only for MNS license users) Enter the interval (in seconds) between two consecutive repetitions.
NOTE: The interval (in seconds) is not used by any of the currently supported device types. - Delete: Delete the uploaded multimedia file.
- All languages: Delete the multimedia files of all languages.
- View: View the uploaded file.
The BrightSign Media Controller supports the following file formats.
- Audio Files
- AAC (LC - Low complexity profile) at a Constant Bit Rate, as part of a video file (.mp4, .mov, or .ts) at 44.1 KHz, 48 KHz
- MP2 (MPEG-1 Layer 2) at a Constant Bit Rate, as part of a video file (.mpg or .ts) at 44.1 KHz, 48 KHz
- MP3 at a Constant Bit Rate (44.1 KHz, 48 KHz, or 32 KHz at up to a bit rate of 224 Kbps) as a standalone file (not encoded as an audio track in a video file)
- AC3 5.1 passed through (un-decoded, RAW data) HDMI. Audio streams in this format are supported by BrightSign players, but will require an AC3 decoder (HDMI AV receiver)
- WAV
- Video Files
- MPEG-2 - Can be saved as an .mpg, .ts, .m2ts or .vob container.
- MPEG-1 - Can be saved as an .mpg container.
- (4K models only) H.265 (HEVC) - Can be saved as an .ts, .mov, or .mkv container
- H.264 (MPEG-4, Part 10) - Can be saved as a .mp4, .mov, or .ts container
- WMV - .wmv video only files (.wma audio files are not supported). Support includes videos exported from PowerPoint
- Information
NOTE:
The .mov files with compressed atoms (metadata) are not currently supported. - Image Files
- JPG
- BMP
- PNG
The maximum supported resolution is 1920x1080.
NOTE1:
BrightSign devices do not support JPEG image files with CMYK color profiles.
NOTE2:
Dynamic Graphics: In distribution setup, if system is unable to extract graphics associated with event source present on other system; it uses the multimedia content configured in the message template. However, system displays the image containing an error message, if there are no multimedia contents configured in the message template.